Introduction
As technology continues to evolve, capturing and recording screen activities have become essential for various purposes, such as creating tutorials, sharing gameplay footage, or preserving memorable moments. However, not all screen recording software offers the ability to change the resolution of the recorded video. In this blog post, we will explore how to change the resolution of a video on a PC using iTop Screen Recorder grabador de pantalla, a versatile and user-friendly screen recording tool.
What is iTop Screen Recorder?
iTop Screen Recorder is an advanced screen recording software designed to capture high-quality videos of your screen activities. It offers numerous features, including audio recording, webcam overlay, annotation tools, and the ability to change the resolution of the recorded video. Whether you are a content creator, educator, or just someone who loves to share experiences, cambiar la resolución de un vídeo iTop Screen Recorder is a valuable tool to have in your arsenal.
Changing the Resolution of a Video using iTop Screen Recorder
Step 1: Download and Install iTop Screen Recorder
To get started, visit the official website of iTop Screen Recorder and download the software. Once the download is complete, run the installation wizard and follow the on-screen instructions to set it up on your PC. After the installation, launch the software to begin.
Step 2: Configure Video Settings
Before you start recording your screen, it’s essential to configure the video settings, including resolution. Follow these steps to do so:
In the main interface of iTop Screen Recorder, click on the “Settings” gear icon located at the top-right corner of the window.
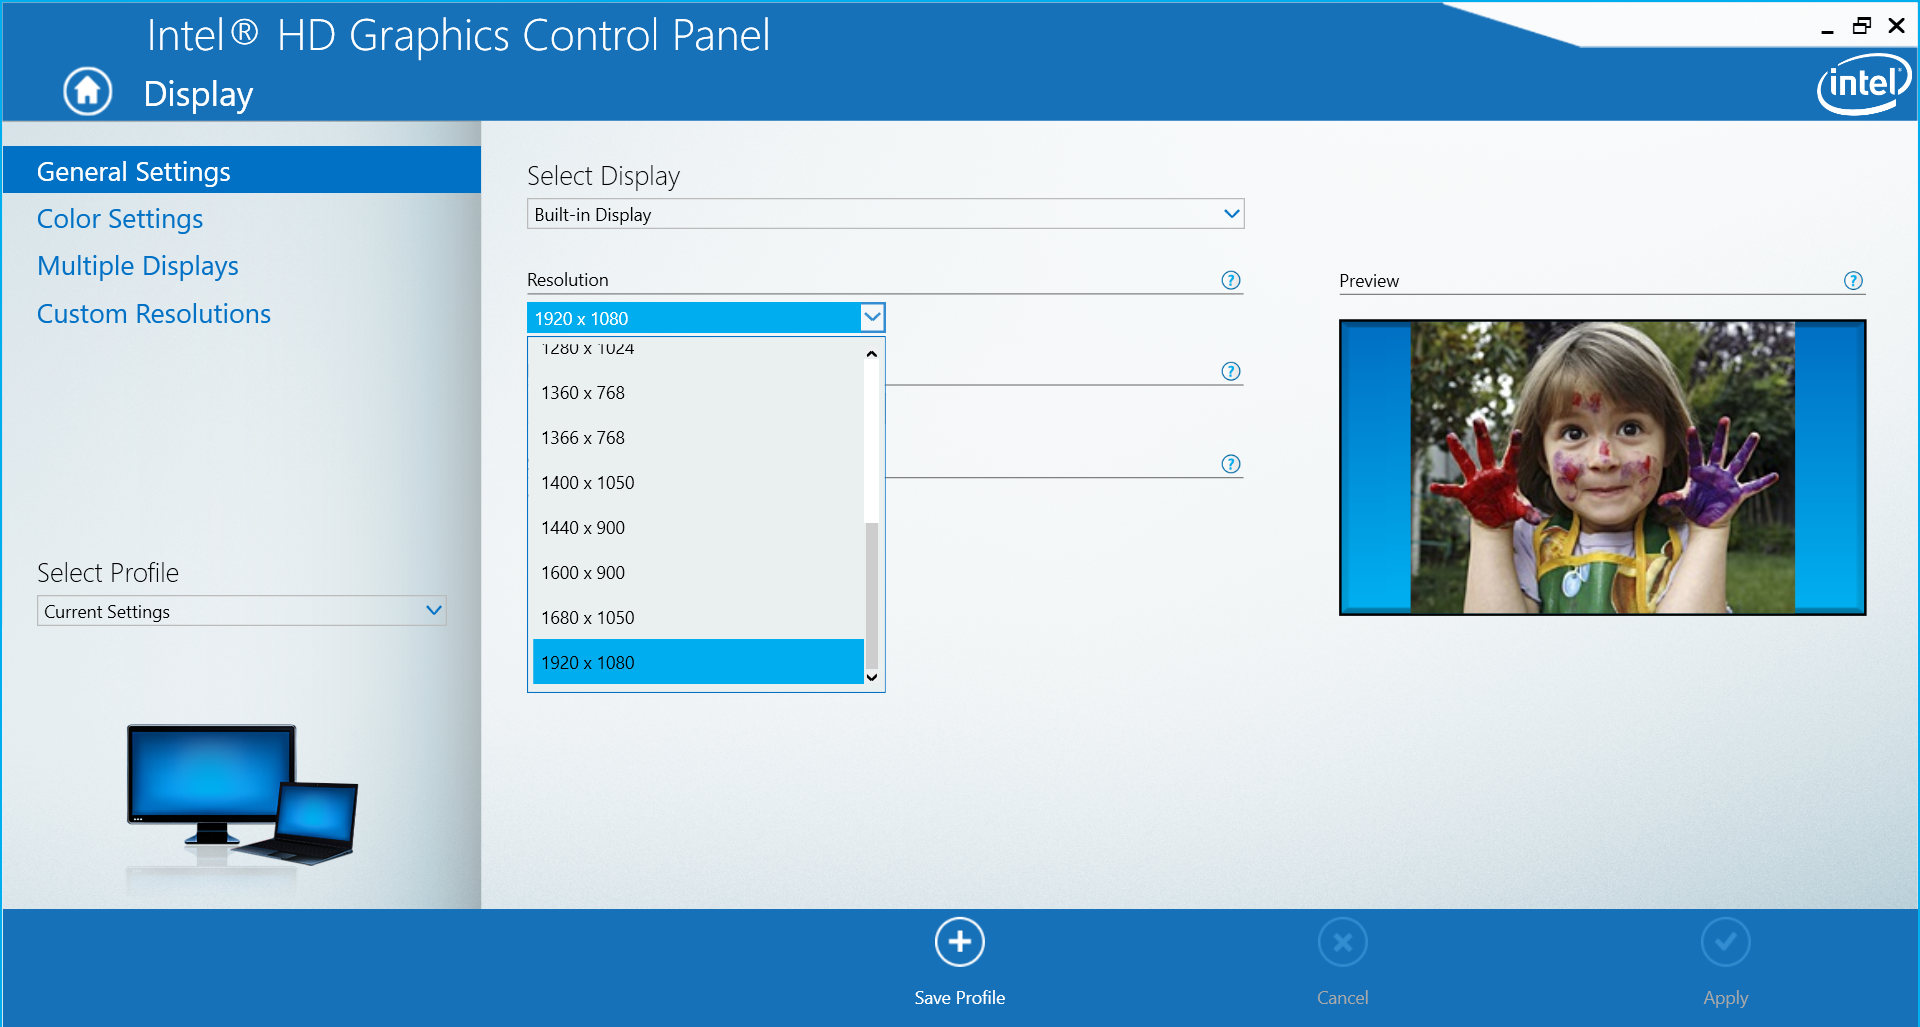
In the settings menu, select the “Video” tab to access various video-related options.
Under the “Video Resolution” section, you can choose from the available pre-defined resolutions or set a custom resolution by entering the desired values in pixels (width x height). It’s recommended to select a resolution that aligns with the intended purpose of the video. For example, if you plan to share the video online, a resolution of 1080p (1920×1080) is generally a good choice.
Once you’ve chosen the desired resolution, click “Apply” to save the changes.
Step 3: Start Recording
Now that you have set the desired resolution, you can proceed with the screen recording. To do this, follow these simple steps:
In the main interface of iTop Screen Recorder, click on the “Record” button, which resembles a red circle.
A toolbar will appear, allowing you to choose whether to record the entire screen, a specific application window, or a custom region. Select the area you want to record.
If you want to include audio in your recording, toggle on the audio icon in the toolbar. You can choose to record system sound, microphone sound, or both.
If you want to add a webcam overlay to your video, click on the webcam icon in the toolbar to enable it.
Once you are ready, click on the “Start” button to begin recording.
During the recording process, a small control panel will float on the screen, allowing you to pause, stop, or cancel the recording as needed.
Step 4: End the Recording and Save the Video
Once you have finished recording, click on the “Stop” button in the floating control panel. The recorded video will automatically be saved in the format and location specified in the settings. By default, iTop Screen Recorder saves videos in the MP4 format, which is widely supported and ideal for online sharing.
Conclusion
Screen recording has become an indispensable tool for various tasks, and iTop Screen Recorder provides an excellent solution for capturing high-quality videos. By changing the resolution of the recorded video using iTop Screen Recorder, content creators can tailor their videos to specific platforms or audience preferences. With its user-friendly interface and a wide range of features, iTop Screen Recorder offers a seamless experience for both beginners and experienced users. So, whether you want to create engaging tutorials, showcase your gaming skills, or preserve precious memories, iTop Screen Recorder is the go-to choice for all your screen recording needs.